Time clock/card entry

Enter time cards daily, weekly, etc. Try to be consistent. This program functions in one of two ways dependent upon how you answered the setup in Update System information.  The question time card program functions as time clock.  If you answer this question with a Y the program will operate time clock as real time.  If you answer this question as N the program will allow entry of time clock information after the fact. There is an audit file for manual changes to the time clock located under Admin in the service shop module.


  1. Select SV Menu>>Processing>>Time clock/card entry..

  2. If the program is performing as time card. the time card header screen will be displayed.

  3. image212.gif

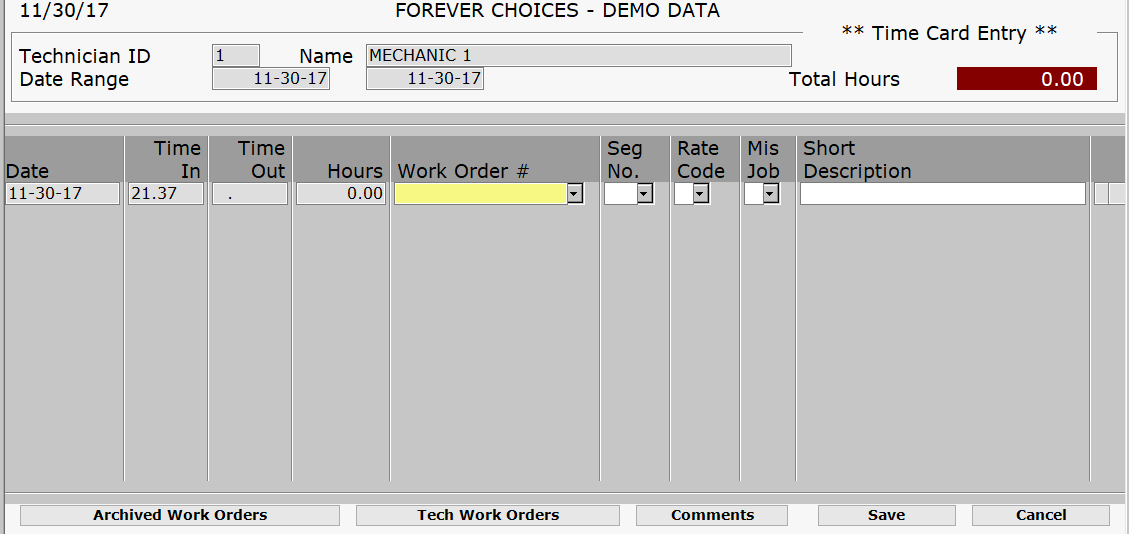
  4. Enter the technician's ID for whom you want to make a time card entry. (Use the F2 pop-up list if necessary.)

  5. Accept or change the date that appears for the beginning date.

  6. Press ENTER.

  7. Enter the time in and time out in military or decimal format (depending on your setup in the Update System Information option.) The HOURS field is automatically calculated using these two fields.

  8. Enter a work order number/estimate  or using the bar code reader you can read in the work order number where the hours are to be charged. If you are utilizing invoice form 37 and the work order is scanned and there is more than one segment, the program will pop-up the segment selection screen. You can select from the F2 pop-up list for this field.  Press F5 if you wish to select a Miscellaneous Job Type.

  9. Enter the segment number of the work order for the hours to be charged against if required. Use the F2 pop-up list if necessary.

  10. Enter a valid rate code if required.

  11. Press ENTER to accept the line and advance to the next transaction line.

  12. A new button option has been added that will allow you to enter Comments while entering time. Select Comment located at the bottom of the screen to enter comments that will print on the work order or Internal Comments if this is for internal reference only. These will write to the work order associated.

  13. When all transactions have been entered, press ESC to exit the labor entry screen.


note.jpg

The last field on the screen indicates whether or not the time card entry has been posted to the work order. There will be an X in this field if this has been done.  The system can be setup to automatically post to the work order when the time is enter.  (Update System Information >> Service Shop)


  1. Select SV Menu>>Processing>>Time clock/card entry..

  2. If the program is performing as time clock, then a technicians password is required.  It can be typed in or read using a bar code scanner reading the technician id tags.

  3. Enter a work order number or using the bar code reader you can read in the work order number where the hours are to be charged. You can select from the F2 pop-up list for this field.   Press F5 if you wish to select a Miscellaneous Job Type.

  4. Enter the segment number of the work order for the hours to be charged against if required. Use the F2 pop-up list if necessary.

  5. Enter a valid rate code and a short description of the work done.

  6. Press ENTER to accept the line and advance to the next transaction line.

  7. When all transactions have been entered, press ESC to exit the labor entry screen.


note.jpg

Time clock/card can also be used for any employee that needs to clock even if they are not a technician. It can be automatic, or can be prompted so that miscellaneous job types can be selected.